Introduction
In the networking devices like routers, DNS, or DHCP appliances, sometimes users prefer the packets of specific protocols to pass through the custom routes instead of a default route. It, therefore, enables the data packets to be transferred over the most desirable path.
Policy Based Routing
Policy Based routing (PBR) is a procedure used in computer networks to forward and route data according to pre-written policies. Packets get routed according to predefined routes based on what filters apply. Various parameters are used to choose what packets get special treatment — parameters like source and destination IP address or ports, traffic type, what protocol is used, and more. The following figure illustrates the PBR configuration for a network interface:

The following figure illustrates the PBR configuration on multi-interfaces:

You can send DNS or DHCP data packets over a network using a different route rather than the default route, labeled as the management interface route in the TCPWave IPAM. Using TCPWave IPAM GUI, you can configure the management interface as ethX or bondX.
PBR – Configuration
Routing tables contain all the routes of destination and source address. To configure PBR in the TCPWave IPAM GUI:
- Sync Network Interface configuration with live configuration.
- Add Custom Routing Table.
- Configure Rules and Routes using the created routing table.
Sync Operation
Before configuring the rules and routes, you must perform network interfaces sync operations on DNS/DHCP/IPAM remote with the live data.
- Navigate Network Management >> DNS/DHCP/IPAM appliances >> Select an appliance >> Network Configuration tab.
-
Click
 . The system displays the NIC Sync pop-up.
- Select Remote to IPAM option – It performs network interface synchronization from the DNS/DHCP/IPAM appliances with live data.
Adding Custom Routing Table
To add a custom routing table:
- Navigate Network Management >> DNS/DHCP/IPAM appliances >> Select an appliance >> Network Configuration tab >> Appliance Routing Table.
-
Click
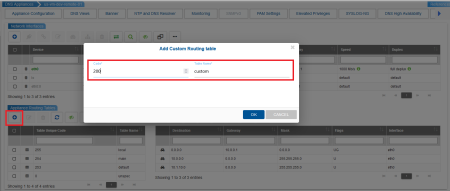
 . The system displays Add Custom Routing Table pop-up.
- Code: Enter the numerical value for the table. Example: 0 – 255.
- Table Name: Enter the name of the table. Example: custom.
- Click OK. The system displays the added custom routing details in the Appliance Routing Tables grid.
Configuring Rules and Routes
To configure rules and routes over the network interface:
- Select any network interface on which you want to add new rules and routes.
-
Click
 . The system displays a pop-up.
- Edit the rule and route file using the edit option. Define the custom table you have created.
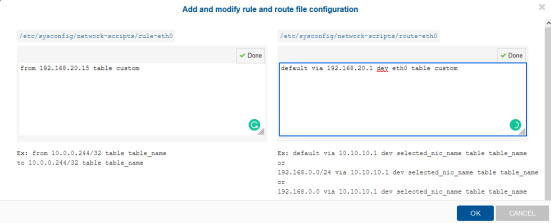
The rule column points at the network IP, and the route column explains how the traffic needs to be routed via a particular gateway. This way, the enterprise can control different traffic via different routes rather than the default route.
To know more about network configuration and the benefits you can get from the flexibility provided by TCPWave IPAM, please contact the TCPWave Sales Team.